|
|||||||||||||||||
Thanks for purchasing BeamCALC™, as easy to use as 1,2,3. Here is a simple example to get familiar with the tool. Notice that BeamCALC is a series of worksheets. The order of these sheets is significant. At the bottom of the window are a set of tabs that let you select the active sheet.
You will most often change values in sheets 2 and 3 in beam design or parametric studies. There are ten named sheets that appear after sheet 3. There are five sheets for simply supported beams and five sheets for cantilevered beams. All sheets share the same units, material properties and cross-sectional characteristics. That way you don't have to change these to compare results. The named sheets tell you the shape and stress in the beam and provide useful statistics, like the stress, mass, and volume of the beam.
If you need to have place two different kinds of loads on one beam, you can use the superposition sheets, but try those after you get simple problems working reliably. Always verify that your work makes common sense. If it doesn't, recheck the inputs. BeamCALC is a useful adjunct to finite element analysis (FEA). If your FEA results do not agree for linearly elastic problems that fit the assumptions in sheet #1, something is wrong with the FEA! |
|||||||||||||||||
| Notice Make sure you read and understand the limitations in sheet #1). These include the limitations of linear beam theory and other limitations: especially self-weight and dead weight. BeamCalc does not include the self-weight of the beam in the stress calculation. It does not account for rust, corrosion, metal fatique or other unknowns. | |||||||||||||||||
Getting Started Go to Spreadsheet #1 and enter your
activation id. This is essential for the software to
work properly. It can take up to two business days to
provide the id, so don't get frustrated. Use the time
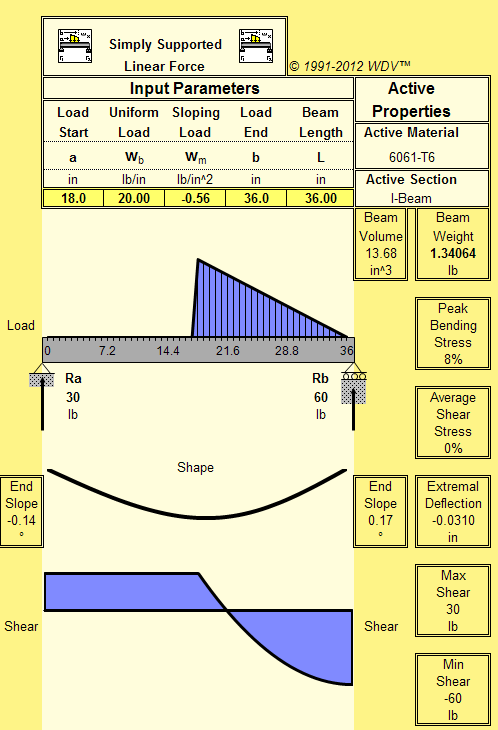
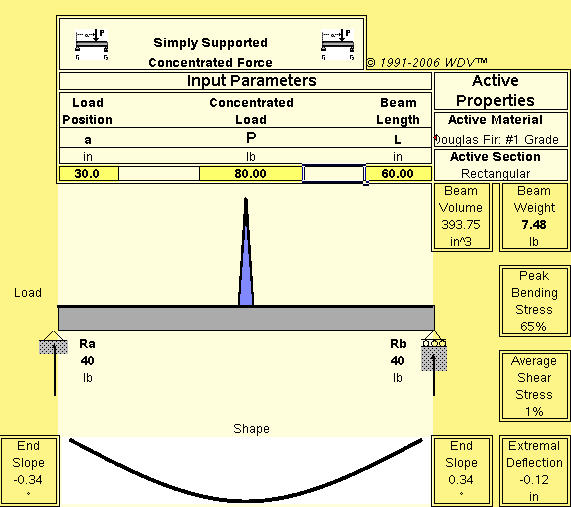
to get to know the software and plan your problem. Let's solve a practice problem to make sure everything is working as expected. Problem: We set a five foot Douglas Fir 2x4 on a sawhorse and place an 80 lb anvil on on it. Does it break?
A real anvil has finite width, but we model the problem as though the force of the anvil acts on a knife edge. The graph of the result looks like it has finite width, but this is just a limitation of the graphing utilities of Excel™. The beam is at 65% bending stress and has an average shear stress of 1%. The beam doesn’t fail until it gets to 100% bending stress, but that is a beam of "computer simulated" wood. A real beam might not do as well due to knots, defects, moisture content and other variations.
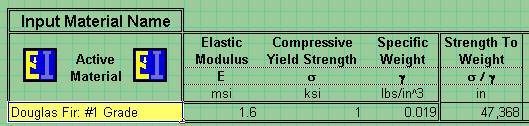
All the best , - Van L. Van Warren MS CS, AE Recapitulation: At the bottom of the spreadsheet workbook, there are a set of tabs. Click on the 1) Set Units worksheet and enter your activation ID. and review the limitations and assumptions. Click on the 2) Choose Material worksheet.
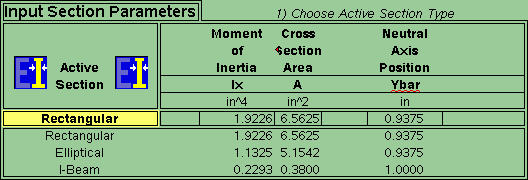
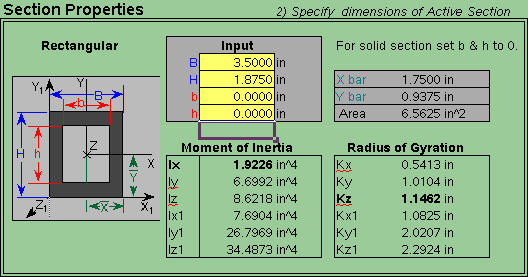
Click on the 3) Set Section worksheet.
Click on the Simple Conc. F worksheet.
Examine the values.
|
|||||||||||||||||